On this page
Storage
How do you organize all those small, intricate hand tools and parts that are so helpful in the construction of an acoustic guitar (or craft or hobby, for that matter), especially when storage space is limited? The keyword here is organize, as it is all to easy to toss items into boxes for storage, only to have to rifle through them later to access what you need. Certain tools lend themselves nicely to being neatly situated in a drawer.
Bench Drawers
Other tools beg for more space, where individual items are readily accessible. A cabinet or shelving may be what they need.
Tool Cabinet
Really tiny stuff doesn't do well in a standard drawer or a wall cabinet, but benefits from the separation and organization only a miniature drawer system can provide.
Miniature Drawers
But what about the everyday items that need to be an arm's reach away? And what do we do with those special items that should never be simply tossed into a drawer or left lying on a bench only to be knocked off onto the floor? I had used simple pegboard racks in the past, but they never quite lived up to the task. There were always a handful of smaller items that had no home, and hanging rulers or straight-edges took up valuable pegboard space.
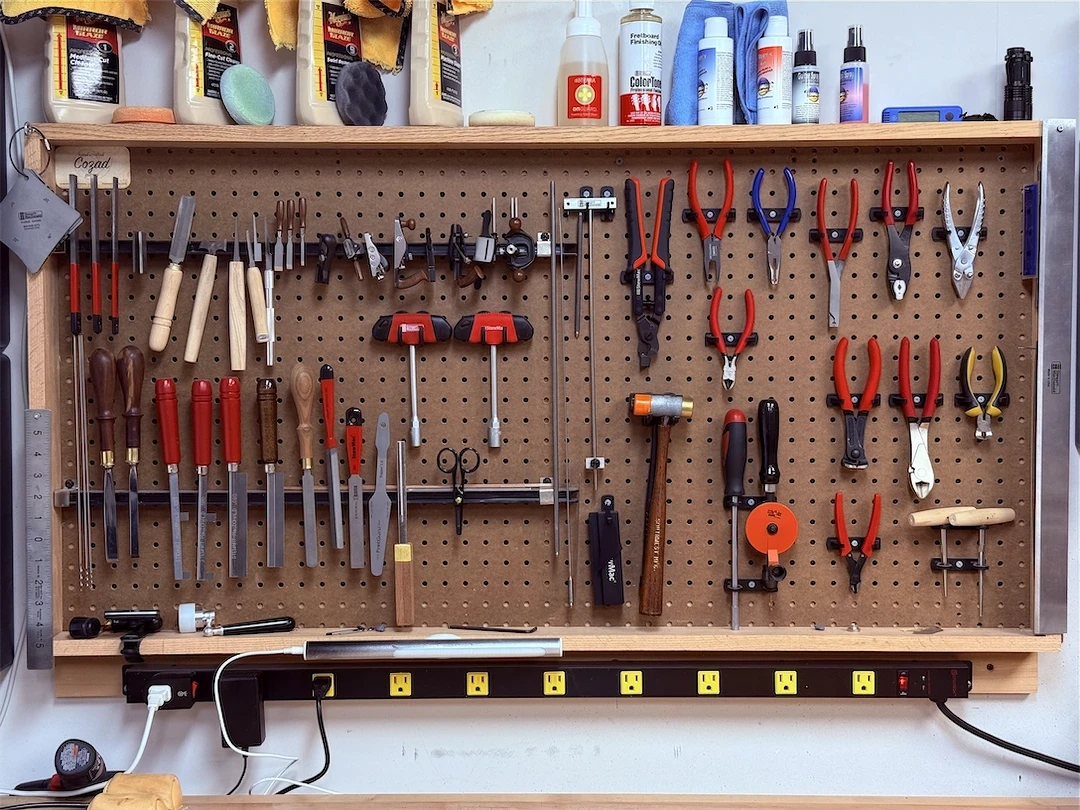
Necessity (in this case: wall space restrictions), being the mother of invention (or re-invention), drove me to think a little before I started sawing. By combining magnets and pegboard, all housed in a sturdy shadow box frame, I produced a modular, moveable solution that works great and looks nice, too!
Pegboard and Support
This tool rack could be built to any size, but I opted to utilize a piece of pegboard I already had cut. It happened to be 24 inches high by 48 inches wide, and I knew it would easily fit in the space I had allotted for it, so my dimensions were determined for me.
Limited Wall Space
To be effective, pegboard needs to stand slightly off the wall to allow clearance for the pegboard accessories. Something needs to mount behind it. I chose to construct a support frame of Poplar using five (5) pieces of 1 x 2, held together by pocket screws. I attach the pegboard to this frame, and then house this pegboard "wall" in an Oak "shadowbox" frame. In addition to stabilizing the pegboard, this support frame gives me something to attach my magnet bars to.
Support Frame
The Shadowbox Frame
Shadowbox design justification: By setting the pegboard into a shadow box, I benefit from two additional narrow horizontal shelves (or ledges) and two vertical narrow walls that essentially occupy the same space as the pegboard. I have faced most of the furniture in my shop with Red Oak (face frames, frame and panel doors, drawer fronts, etc.), so I chose to use Oak for the shadowbox, too.
Red Oak at the Jointer
Four (4) pieces of 1 x 4 inch hardwood form a frame. A stop dado/groove wide enough to house the pegboard and Poplar frame is let into the 1 x 4, 1/4 inch in from the back (wall edge) of the board(s). Several methods could be used to construct the shadow box frame, including simply nailing or screwing four boards together, but I thought hand-cut dovetails would be fitting.
A few hand tools are needed:
Marking Gauge
Marking knife (or pencil/pen)
Dovetail template (optional)
Dovetail saw
Coping saw
Chisel (sharp, sharp, sharp!)
Mallet
Smoothing plane
Dovetailing Hand Tools
Hand-cut Dovetails
Two boards joined at right angles to one another using a dovetail (or fan-tail) joint form a near inseparable bond, especially when glue is also applied. I am using the standard through dovetail joint, where the end grain of both boards is visible. Tails cut into the end of one board fit tightly into mirror-image sockets (called Pins) in the end of another board.
Dovetail Close-up
After preparing the wood to be used (dimensioning, truing, squaring, etc.), the boards are cut to size. It is important to identify the mating corners and mark them well, distinguishing which two boards will be the Tails and which will be the Pins. In my pegboard shadow box, the Tails will be cut into both ends of the vertical boards, and the upper and lower horizontal boards will receive the Pins.
A marking gauge is set to the thickness of the board, and one end of each of the four (4) boards are scribed. The Tail boards get a scribed line all around the board, on all four (4) faces (front, sides and back), while the Pin boards are scribed across their front and back faces only (not on the sides).
This knife-edge line serves as an obvious reference line to determine the depth of cut and, more importantly, severs the wood fibers providing for a clean chisel line when the waste material is chopped out (More on this, in a moment).
Using a Marking Gauge
Once the ends of the boards are scribed, I draw the Tails. Rather than lay out spaced lines with a pair of dividers and then calculate and draw the angles using a small square, I prefer to simply use a dovetail marking template. This small wood or metal tool lets me visually locate the placement of the Tails. Once located, I can simply draw or scribe a line on the board by tracing along the edge of the template.
Aesthetically and functionally, it is nice to see something close to one-third to one-half the width of a Tail at both edges of the board. These empty spaces will be filled by the Pins, and if the spacing of the Tails is such that too small of a space be remaining at the edges, it is quite likely the Pins will split when the joint is assembled.
By cutting the Tails first, having laid them out in a visually pleasing as well as functionally sound manner, and then using the already cut Tails as the template for laying out my Pins, I am assured of well-mating joints.
Dovetail Marking Template
The marking template ensures consistency across the piece. It is certainly not required. What is beneficial, though also not required, is having pencil lines to follow while making the cuts.
Pencil Lines
The waste material around the Tails is removed using four (4) tools: a Dovetail saw, a Coping saw and a chisel and mallet. First, I saw along the marked pencil lines of the Tail up to (but not across) the scribed line using the Dovetail saw.
Dovetail Saw
The next step uses the Coping saw to complete the waste removal. I carefully saw horizontally across the waste, close to but not on the scribed line. It is important to leave a small amount of waste for the chisel to remove (See the paragraph below regarding removing the waste from the Pins for a photo).
Coping Saw
The next step is to meticulously trace the Tails onto the Pin board. My accuracy at this stage determines the fit. This involves securely holding the corresponding Pin board vertically, while laying the Tail board horizontally across it and drawing pencil lines. TIP : Resist the temptation to draw fine pencil lines when you are also distracted on a phone call. Like me, you may end up with more graphite on your work than is actually needed.
Transfer the Location of the Tails
Pin Board with Waste Area (Tails) Marked
Once traced, I saw the Pins by carefully splitting the pencil line with the Dovetail saw (I saw right down the middle of the traced line). If you allow the saw to wander to one side of the line or the other, instead of a tightly fitting joint you end up either with a sloppy fit or have to fiddle with the joint using the chisel. As before, remove the waste using the Coping saw, leaving some material for the chisel.
Remove Waste Material
With the board secured flat on the bench, remove the remaining waste with a chisel. Work with small, shaving cuts up to the line that was scribed using the marking gauge. For the final cut, carefully set the chisel into that scribed line, flat side facing in toward the board and bevel side facing out to push the waste away.
TIP : For a precise fit, maintain the chisel perfectly perpendicular to the board. Strike it with the mallet to cleanly shear the end grain. Only chisel halfway through the material (turn the board over to complete the process).
Chisel Out Waste
Chisel Work (Close-up)
I cut a groove into all four (4) boards, being careful to keep the groove enclosed as to not be visible from the outside of the shadowbox frame. This required a small amount of chisel work, as I chose to use the router table to plunge the groove (it could also be accomplished on the table saw using a dado set, though it would require a bit more chiseling).
Groove for Pegboard Frame
If everything came together properly, the Tail board should fit snugly into the Pin board, requiring only a few taps of the mallet to firmly seat the joint. If adjustments are needed, make them carefully, as you certainly don't want to view a Dovetail joint full of unsightly gaps and it is painful to start over.
Completed Dovetail Joint
Assembly
Once I had dry fit the parts and was happy with the results, a small amount of glue was applied to help hold everything together.
NOTE : If your dovetail joints are cut and fitted accurately and are snug, a little moisture to swell the wood is all that is needed to hold things together. Tight fitting Dovetail joints do *not* fall apart, nor do they require copious amounts of glue to stay together! Wood can shrink as well as swell, so I like the extra security afforded by a little bit of glue wiped on the sides of the tails. The ONLY purpose of the glue is to prevent the tail from sliding back out the way it went in.
*** THIS IS ALSO APPLICABLE TO GUITAR NECK JOINERY ***
I clamped the assembled case together, checked to be sure it was square and waited for the glue to dry. After removing the clamps and scraping away any remaining glue residue, I gave the boards a final sanding and mounted the frame to the wall.
The fun part was arranging the tools. I had two (2) 24 inch magnetic tool bars that I wanted to utilize. I spaced the brackets that came with the magnetic bars so they secured the bars to the poplar frame underlying the pegboard. I made use of a set of plastic pegboard hooks of varying sizes and styles to hold my oft-used tools at eye level, right in front of me. The oak frame gave me the extra (mini) shelves and hanging space that was always missing from my overly simplistic pegboard racks of yore.
Luthier Tool Rack