Situation: The strings are so far off the fretboard of my guitar that it actually hurts to try to press them sufficiently to clearly sound a note or chord. Someone said I probably need a neck reset. What is a neck reset? How do I know if my guitar really needs one? Could there be other issues with my guitar that would cause extremely high action? Is high action the only reason for a neck rest? What should I look at, first?
While this article focuses on neck resets as they pertain to steel string acoustic guitars, the principles apply to electric guitars, as well.
1976 Guild F-212 XL
Several things must come together for an acoustic steel string guitar to be considered eminently playable. Factors such as body size and shape, overall weight, neck width and depth (or "thickness"), as well as features like arm bevels, cutaways and sound ports all contribute to my perception of a comfortable guitar.
When setting the neck (joining it to the body), getting the geometry correct is absolutely critical. The perfectly flat plane of the strings, secured at one end at the headstock and (typically) secured at the other end onto or into the bridge, must be close enough to the fretboard to be pleasant to play while not being so close that strings make constant contact with the frets, causing a "buzzing" sound. It would be great if we could just stop there, but there are more considerations to be factored in when setting that neck angle properly.
In addition to an accurate neck set angle, there are a few adjustable elements that I can control, either in part or fully. How well these elements are addressed will ultimately determine the playability of my guitar. These elements typically fall under the general category of a guitar "setup" and include such items as the condition of the fretboard, its flatness, the condition of the individual frets, the nut (material, fit, slot depth), the functionality of the truss rod (if so equipped), relief, fall-away (any or none), bridge condition (overall height, splits, saddle slot positioning (compensation)/depth/flatness, etc), bridge pin holes and pins (if so equipped), to ramp or not, saddle (material, height, intonation), and more!
A common practice used to check to see if a neck reset is required is to rest a straightedge across the top of the frets of the fretboard. As the test is presented, if the straightedge just kisses the top of the bridge, as opposed to ploughing down into the soundboard, you are to conclude that no neck reset is required.
Neck Reset Straightedge Test
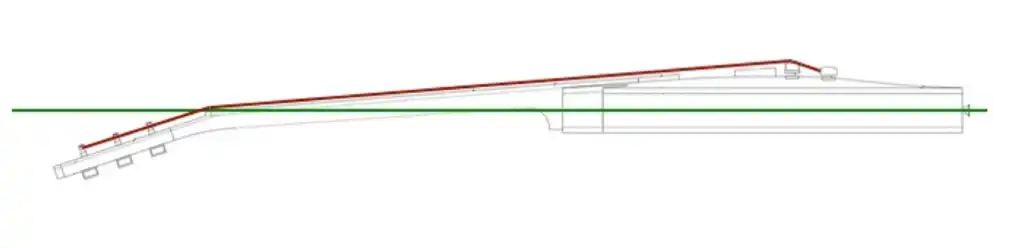
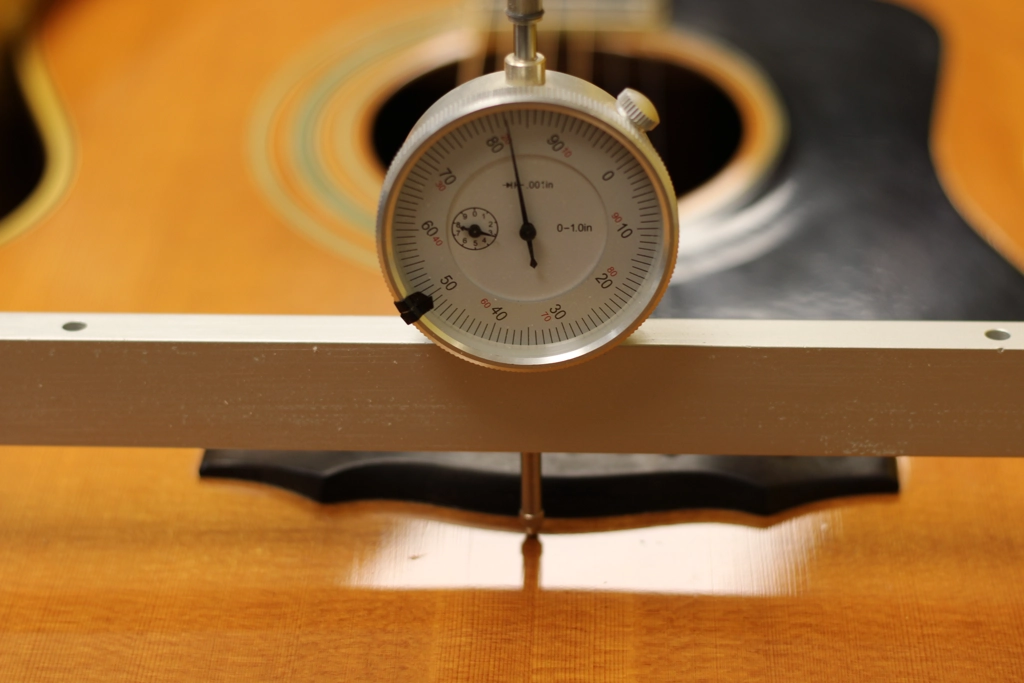
If you happen to have a true straightedge (not a yardstick, not a ruler), and that straightedge happens to be thin enough to sit between the strings, and it happens to be of sufficient length to fit between the nut and the front of the bridge, and you can verify that one end of the straightedge is in contact with the first fret, and the straightedge is in contact with the fret at the body joint (12th, 13th, or 14th fret), and the end of the straightedge closest to the bridge is well below the top surface of the bridge, then YES, you can be fairly confident that your guitar needs a neck reset.
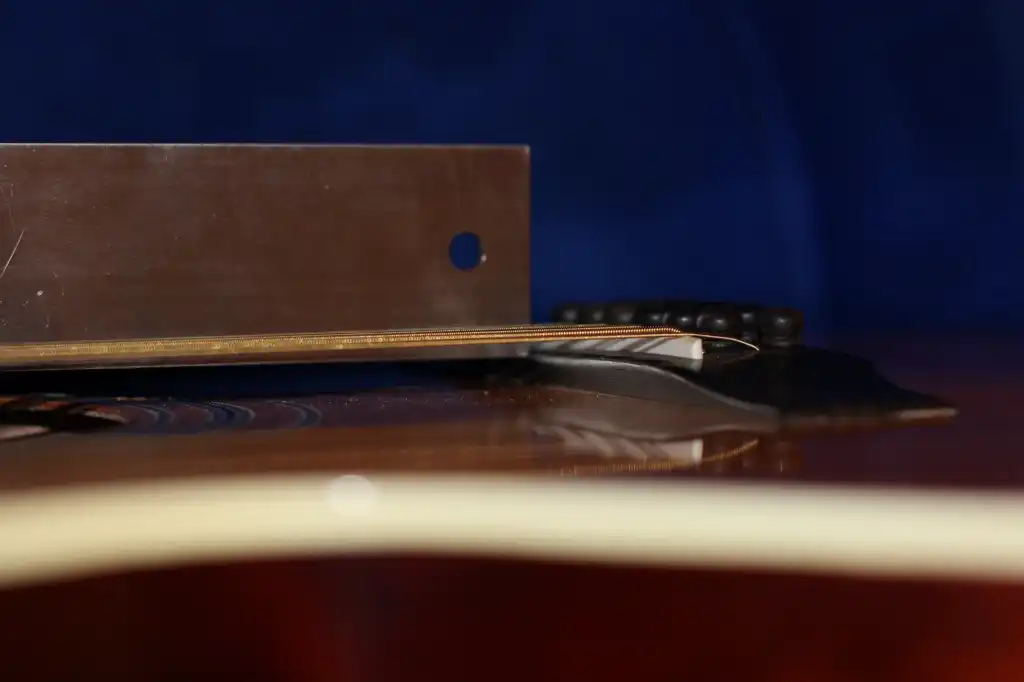
However, this straightedge test does not tell you the whole story, a story I attempt to explain in detail in this article. It is quite possible that your guitar can pass the straightedge test where, instead of falling below the top surface of the bridge, a straightedge laid across the frets makes contact with the top surface of the bridge, but the guitar is in desperate need of a neck reset. This is the case with the guitar in the photo, above.
To recap, most of the guitar owning and playing world has some awareness of the common practices of adjusting the truss rod to flatten a forward bowed neck and/or lowering saddle height to adjust the string height above the frets for playability. The ubiquitous belief is that a neck reset, where the neck is removed and the neck to body geometry is corrected, is inevitable but, until such time, so long as my guitar can pass the straightedge test AND I "have a little saddle remaining" THEN my guitar is fine.
But my guitar is NOT fine. Not only is my guitar, for all intents and purposes, unplayable, but it is currently only capable of producing sub-optimal volume and tone. What factors definitively inform me of my guitar's need for a neck reset? Allow me to provide you with a more accurate test to determine if (and when) a neck reset is necessary.
While the straightedge test may provide insight into potential string plane and neck geometry issues, it is insufficient, by itself, to determine if a neck reset is warranted. There are seven (7) measurements/assessments needed to determine if a neck should be reset on any given acoustic guitar:
Start at the start!
We are checking for forward neck bow (or "curl"). Under string tension, the fretboard should be flat, particularly from the nut to the 12th fret. If relief is permitted or induced, it should be in the range of 0.001" to 0.003". If the fretboard cannot be flattened, even after tightening the truss rod (if one is present, or is broken), there is a problem with the neck that needs to be resolved before proceeding. This may involve steps such as removing the frets and (re-)planing the the fretboard, or removing the fretboard to repair/replace/install a faulty truss rod, or replacing the fretboard, or even as drastic a step as replacing the neck altogether.
Once a flat plane of the fretboard can be verified, the next measurement/assessment step can be taken.
If the adhesive holding the bridge to the soundboard lets go completely, the bridge tears loose from the guitar and must be re-attached. In a more destructive scenario, due to some combination of glue-to-bracing failure, soundboard thickness, and/or severe runout, the bridge not only tears loose, but rips a section of the soundboard loose with it. This could involve a much more extensive effort to rectify, including a replacement of the soundboard.
Short of such drama and most often due to a common practice of bridge attachment that leaves the very back edge of the bridge un-glued, a bridge may begin to tilt forward and lift up and away from the soundboard. To complicate matters, this lifting may have a deleterious effect on the existing glue bond, tilting the bridge forward even more.
Bridge lift results in the raising of the string height off the fretboard and must be repaired before proceeding.
Bellying is a deformation of the soundboard caused by the pull of the strings on the bridge. It often occurs as a result of the forward rotation of the bridge, where the bridge literally tilts toward the soundhole (fretboard, headstock, etc) and the soundboard behind the bridge is visibly pulled upwards. In the case of insufficient bracing or a glue failure, the soundboard and bridge may visibly lift as a unit.
Depending on the severity of the lift, not to mention whether you consider this to be a preferred condition or something to recoil from in terror, soundboard bellying also results in the raising of the string height off the fretboard and must be repaired before proceeding.
Step 4 offers a shortcut to seasoned luthiers and guitar technicians to determine if a neck reset is needed. After establishing that the guitar has a flat fret plane, there is no bridge lift (of concern), and there is no bridge rotation/bellying (or there is not enough to worry about), if the saddle is buried in the saddle slot such that the strings are laying on the bridge, then we can be assured that the neck must be reset. In order to determine the metrics to use for correction, it is necessary to continue with the measurements/assessments, but we do not require more proof of the need for a neck reset.
For the traditionally built, center soundhole, X-braced, steel string acoustic to produce both maximum volume and optimum tone, it is necessary to achieve maximum optimum height of the strings off of the soundboard as measured directly in front of the bridge. Insufficient string height will result in weak(er) output.
With the strings tuned to pitch, measure the height of the strings from the soundboard, directly in front of the bridge. This measurement should be no less than 1/2″ (12.7 to 14 mm). But for some rare exceptions, if you are getting a lower number measurement, it is safe to say that your neck geometry is off, and your guitar is NOT performing optimally. Of course, you will decide whether you wish to have it corrected, or not. Such a correction may be as simple as adding a taller saddle, and resetting the neck. But it may also require a new, taller bridge to properly support the taller saddle.
Increasing the size of the bridge will impact the output of the guitar. Before you assume this to necessarily produce a negative impact, realize that on all but a very few acoustic guitars, there is little to no "scientific" pairing of bridge mass to soundboard mass (thickness, stiffness, weight, etc.). It has often been the case (and may be in your own case) that a larger (or taller, or wider, or deeper, etc) bridge actually improves the output of your guitar.
Two additional factors should be considered to confirm (prove beyond a shadow of a doubt) that a neck reset is needed.
At this stage I assume that the fretboard is now flat, the fret surface plane is perfectly level and any and all crowning/polishing work is complete.
The strings are suspended in a flat plane between the nut and the saddle. If your guitar is fitted with a Zero Fret on which the strings rest as they emerge from the nut, no additional measurements are necessary. Move on to the last Measurement/Assessment.
If the nut on your guitar is acting as fret 0, as is the case with most acoustic guitars, and you are familiar enough with proper setups to know that your nut slots are cut and filed perfectly, and are as low as they can go without introducing string buzz, no measurements are necessary. Move on to the last Measurement/Assessment.
Nut slots should be cut and filed as low as they can go without introducing string buzz. The bottom of the nut slot should be the height of fret 0, had a fret wire been installed on your guitar in place of a nut. You can verify the proper height using a dial indicator made for the purpose, or feeler gauges, or a single-bevel marking knife, or you can even sand a pencil in half, lengthwise, lay it across frets 3, 2 and 1 and use the super-sharp pencil point to mark a line across the front edge of the nut. This is the lowest that any of your individual string slots can be cut without permitting a string-to-1st fret contact. If your slots are sitting above that mark, they can and should be lowered.
Very often, this little detail gets overlooked. In conjunction with action height, nut slot height is the primary distinction between a guitar that "plays like butter" and one that "cuts into my fingers." Let's move on to the final Measurement/Assessment.
Ultimately, action height is a primary contributor to playability. We have seen that string action is determined by a relationship between the fret plane, the nut slot height and the saddle height. The saddle is an independent component that is understood by most to be modifiable in height after the guitar is assembled. Believing that "as long as "a little saddle is remaining" above the bridge, all is well, it is easy to understand why a relatively straightforward modification such as shortening the saddle to lower the action and adjust the string height is commonplace.
The claim I am about to make should no longer be controversial, but it may rock your world if you are unfamiliar with it:
Establishing the string height for player comfort is the primary role of the neck geometry, not the saddle.
You may want to read that last sentence again. For conventional guitars, once the optimal overall string height is established, it should be alone. Adjust string action height at the neck joint. Note the benefits of a bolt-on neck.
Sadly, for many builders, overall string height (measured in front of the bridge) was (and remains) an arbitrary measurement. Necks get attached to bodies at some approximate, or "close enough" angle. Bridges are then sized in height to accommodate the string path as determined by the pre-set neck. This may be efficient by factory production standards, but it is backwards. First, the bridge should be attached, having a pre-determined, pre-established bridge and saddle height combination. Then the neck should be attached to target that established height.
Maintaining that optimal overall string height at the saddle, slotting the nut to the zero fret depth, and finally setting the neck such that the string path above the fret wire is as low as it can go for your style of playing makes for a perfect setup. If you have achieved that, you do not need a neck reset. You are welcome to read through the rest of the article, or move on to other topics.
If you are new to the guitar, don't really know what "as low as it can go for your style of playing" means, or just like measurements, here are some details:
Conduct two (2) measurements, one for the bass string and one for the treble string. Measure the distance between the bottom of the string and the top of the fret wire beneath it (NOT the fingerboard) at a point halfway between the nut and the saddle. It is typically safe to conduct your measurement at the 12th fret (again, between the fretwire and the string). Measure strings 1 and 4 on a Tenor guitar, or strings 1 and 6 on a 6 string guitar. For a 12 string guitar, measure string 1 and the larger diameter string of the 6th course (typically string 11). Generally acceptable heights are as follows (you may wish to be slightly lower or higher, depending on your playing style):
Overall string height measuring below 1/2″ may be corrected by installing a taller saddle, though a new bridge may also be required. If correcting the overall string height results in raising the action such that your guitar is now uncomfortable to play, your neck geometry is off and you will require a neck reset to correct it.
If your overall string height is acceptable, BUT your action is too high, AND adjusting that action (such as by shortening saddle height, for example) would drop your overall string height below 1/2″, your neck geometry is off and you will require a neck reset to correct it.
Whether or not you want to reset the neck (or pay someone to do it) is immaterial to concluding that a neck reset is necessary to restore correct neck geometry.
My guitar, the one in the photo that inspired this article, the guitar that passed the straightedge test, is suffering from a slight belly due to some bridge rotation. Let's assume I have determined to live with this condition. I note that the saddle projects 1/8″ above the bridge which, by the way, is a mere 1/4" tall. Many would (wrongly) suggest that "there is plenty of saddle left" and start sanding away.
Plenty of saddle to do what with, exactly?
Currently, when bridge and saddle height are added together, the overall string height only comes up to 3/8″, falling short of an optimal height of 1/2" to produce proper torque on this guitar (especially when considering how heavily braced the soundboard is).
Compounding the problem, action at the 12th fret is a whopping 9/64″! Do the math: Lowering the action from 9/64" to 6/64" would require taking 6/64" (3/64" x 2) off the saddle. There is only 8/64" (1/8") remaining above the bridge. Taking such a step would effectually bury the saddle in the slot. Most importantly, it would further reduce the overall string height in front of the bridge. Essentially, if I were to take conventional steps to make this guitar more playable, I would kill what remains of the sound of this guitar.
Without question, I have but one choice before me, and that is to reset the neck of my guitar.
If you have made it this far into my article, you may have gained some insight as to how to determine whether or not an acoustic guitar requires a neck reset. But you may be prompted to ask, "Why would a well-built guitar ever need a Neck Reset?"
Many appear to be under the impression that acoustic guitars require a neck reset "because the body of the guitar deforms under string tension, causing the neck to rotate."
This is not entirely accurate. For an in-depth look at what actually lies behind the need for a neck reset, see my article » Neck Block Shift.
We'd like to assume that every guitar ever made had its neck set properly prior to being offered for sale. Unfortunately, that is not the case. More than one brand new guitar has needed a neck reset right off of the showroom floor to be optimized for performance. In such cases, a neck reset is necessary to correct a mistake, one made during initial construction.
In most cases, however, a neck reset is needed to correct for glue failure and/or structural failure that has occurred later on in the guitar's life.
If each and every component of a wooden acoustic guitar simply stayed put, precisely where it was placed when the guitar passed its initial Quality Control inspection, no guitar would ever require a neck reset. And there would be no need for truss rods. And saddles would never need to be lowered. And frets would never need replacing. But things don't always stay in place. Over time, and subjected to various environmental changes and wear, things move away from their original locations.
Left in a hot car, glues soften and guitars come apart. But you already know that, and that is not why I am bringing up automobiles in an article dedicated to a guitar neck reset. Beyond the obvious issue of heat damage, there are parallels that can be drawn between guitar and automobile ownership, and this may be helpful in gaining a different perspective regarding neck resets on acoustic guitars.
People ride in or drive automobiles that they rent, lease, or own for all sorts of reasons. For most of us a car (or truck or van) is a necessity as a means of transportation. For some, it is just a tool. For others, it is a status symbol or even a toy. Still others see it as a commodity to be bought and sold for profit. And there are those who would prefer to accumulate as many vehicles as possible, and perhaps one day charge admission to view them. Don't forget the professional drivers out there for whom an automobile is a showcase for their skill.
Regardless of the reasons for driving or owning a car, these vehicles are going to require servicing at some point. Some service items are relatively minor, while others are not. Keep a car long enough, or inherit it from someone else who kept it long enough, and certain things will have to be addressed.
Cars | Guitars |
---|---|
Washing | Cleaning |
Waxing | Polishing |
Garaging | Casing |
Tune-ups | Setups |
Tires | Refret |
Collision repair | Brace re-glues and split cleating |
Reupholstery | Refinish |
Transmission or Engine overhaul | Neck reset |
You are welcome to map your own parallels. My purpose in doing so is the hope that you realize that whether you view the inevitability of maintenance and repair (such as a neck reset) to be a life-altering, traumatic encounter of ultimate devastation, and something to be avoided at any and all cost, or just another thing you need to take care of or deal with, is entirely your choice.
Sadly, for most traditionally-built acoustic guitars, a neck reset is one of those things that, more than likely, is going to be required at some point.
You may have heard someone speaking about neck angle and/or neck geometry and wondered what they were referring to. In addition to the shape, width, thickness, and overall weight of a given acoustic guitar neck, the angle of incidence at which that neck joins the guitar body is a critical factor in both realizing the sonic potential of the guitar and determining its playability.
On an aircraft, such as the high-wing Cessna in the drawing below, the Angle of Incidence between the chord of the wing (imagine a straight line drawn through the center of the leading and trailing edges, shown by the red line) and the longitudinal axis of the body (shown by the green line) can be clearly seen.
Cessna wing Angle of Incidence
When applied to the guitar, there are two angles of incidence that can be considered. The first is the plane (as in planar, not airplane) of the neck and/or neck/headstock in relation to the plane of the body. The second is the string path in relation to the body and neck.
Consider the side profile of a Fender Stratocaster. The longitudinal axis of the body is shown by the green line. The red line shows the string path. Notice how the neck, body, and headstock are all in parallel with the longitudinal axis of the body. The "chord" formed by the string path in relation to the longitudinal axis of the neck/body unit demonstrates a very shallow angle of incidence.
Fender Stratocaster
Contrast the Fender Stratocaster with the Gibson Les Paul. Again, the longitudinal axis of the body is shown in by the green line, and the red line follows the string path. Note how the neck deviates from the longitudinal axis of the body, and the headstock deviates from the longitudinal axis of the neck. Compared with the Strat, the "chord" formed by the string path in relation to the longitudinal axis of the neck/body unit demonstrates a sharper angle of incidence.
Gibson Les Paul
As you can see, the angle of incidence of the typical acoustic guitar neck, as well as the angle of incidence of the typical acoustic guitar string path sits comfortably in between the Les Paul and the Strat. The angle of incidence of both the neck and the string path of an acoustic favors that of the Strat, where the angle of incidence of the headstock of an acoustic is more akin to that of the Les Paul.
Acoustic Guitar
The angle at which the neck joins the body is not arbitrary; it is intrinsic to the design of that guitar. Failing to target the optimal neck angle, an under-set or over-set neck will negatively affect playability, at the very least, and actually affect the overall tonal quality of the instrument.
ONLY NOW are you able to determine the proper neck angle.
What, exactly needs to be corrected in order to improve playability?
The most common approach to resetting the neck, and that endorsed by guitar techs and repair shops throughout the Earth, is to entirely ignore Overall string height, instead using the height of the existing bridge as the reference against which measurements will be taken and calculations will be made. Among the instruments on which this approach is taken, most will require a negative reset. This means that material will need to be removed from the heel in order to drop the headstock and raise the plane of the tops of the frets above the soundboard. There is such a thing as a positive reset, where material must be added to the heel to prevent the strings from laying on the frets, but that is atypical.
A straightedge is laid across the tops of the frets. An assumption is made that the top surface of the (existing) bridge should be on the same plane of the tops of the frets. When the plane of the tops of the frets falls below the surface of the bridge, the measured difference between the two is multiplied by the length of the neck heel, and the resulting product is then divided by 1/2 the scale length. This determines the maximum amount of material that will be removed from the heel cap, that number being gradually reduced to 0.00 where the heel meets the bottom of the fingerboard. A "wedge" will have been removed (shaved, planed, chiseled, sanded) from the heel that lets the neck tilt farther back and away from where it was before beginning the neck reset.
Basic Neck Reset Calculation
When I am resetting a neck, to determine how to address the neck heel I ignore the existing bridge and make my calculations against my target overall string height. If I can achieve that height using the existing bridge (and typically fashioning a new, taller saddle), great. If not, I make a new bridge.
While this approach is not dissimilar to setting a neck on a brand new guitar, there are additional factors to consider when resetting a neck on an already built guitar, factors that will affect the measurements used to determine how much material to remove from the neck heel. These factors include bellying behind the bridge, sinking in front of the bridge, and shift/collapse at the neck block.
It is advisable to take measurements with the guitar strung to pitch and compare those results with measurements taken after the strings are removed.
For the soundboard measurements, you can use a dial indicator that references the rims. You can also lay a straightedge across the top and note the deviation from a flat plane.
Measuring Top Deflection with a Dial Indicator