Neck Blocks, Tail Blocks and Linings

Most steel string acoustic guitars having wooden bodies are constructed by attaching bent, curved sides to blocks, one positioned at the neck end of the body and the other at the opposite end, or tail. Those sides then receive an additional treatment in the form of two small ledges (called linings) added around the inside perimeter of both the front and the back of the sides. Sides, blocks and linings together form a shell onto which both a braced or arched front plate (also known as a soundboard or guitar top) and a braced or arched back plate are glued, completing the body. The guitar neck, constructed independent from the body, is then attached to the body by joining it at the neck block. This is what is often referred to as a traditionally built acoustic guitar.

This article will explore the details of constructing and applying all three elements, the neck block, the tail block and the linings. I'd like to dedicate the article to Harold F. who inspired its writing.

Body shell (no Back, no Soundboard)

A Wood Primer

We are told that wood is composed of cellulose, hemicellulose, lignin and water. Various species have additional extractives such as oils and resins that color the wood and provide its fragrance, along with varying degrees of rot, insect and fungus resistance. Cellulose, said to be a polymer, makes up about 50% of the composition of wood and is responsible for its strength. Lignin, an amorphous polymer, acts as a binder for the cellulose. It is often described as a matrix in which the cellulose resides, or as the adhesive that glues the wood fibers (cellulose) together. We find more lignin in the softwoods (up to one-third of the composition of the wood) than in the hardwoods, which helps to explain why you can dent Cedar with your thumbnail, and bend or break that same nail on Ebony. The long, thin cellular structure of wood (long in the axial direction, thin in both the radial and tangential directions) is comprised of many layers of microfibrils, bundles of cellulose chains that are coated first in hemicellulose, then in lignin.

A cross section of a tree, cut perpendicular to its trunk, reveals four distinct layers::

  • The bark: the outer skin
  • The cambium: the actively growing layer of the tree
  • The sapwood: the moist, living layer of the tree
  • The heartwood: the inner core of the tree, comprised of darker, denser and harder material


With a new layer being added each year, the visible rings of such a cross section are (cleverly) called annual growth rings. The tree is fed via a network of tubules called xylem that supply nourishment from the roots up through the trunk, out through the branches, and into the leaves. 

Layers of a tree

Cutting vertically through the trunk of the tree, you can see the xylem running parallel to the trunk. We refer to this structure as the grain of the wood.

Wood is said to be anisotropic, meaning it has differing strength in different directions. Contrast this with an isotropic metal, which has the same strength in any direction, and you begin to see the role of the grain direction of wood as it relates to its strength. Wood is significantly stronger along its grain than across it, and some species are significantly weaker across their grain than are others.

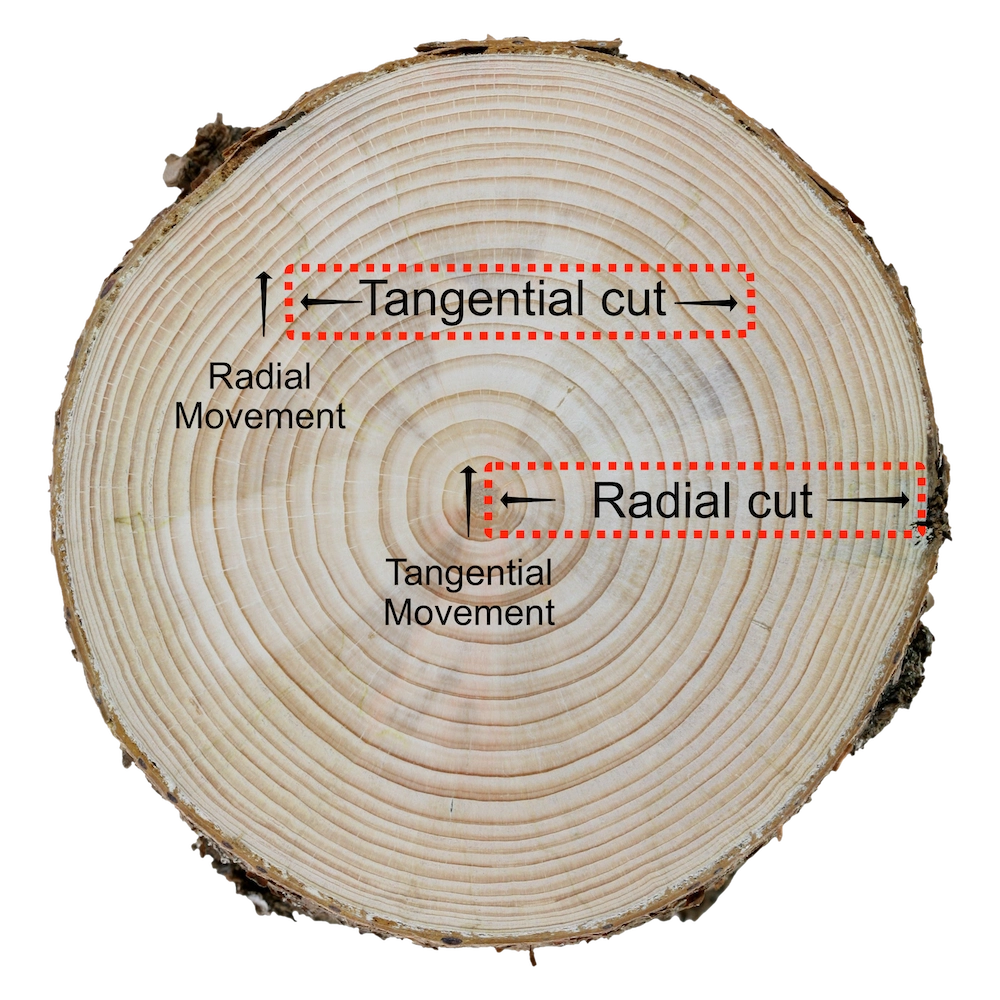
A given board (plank, billet, etc) is said to be strongest longitudinally (axially), along the length of its grain. Boards are typically cut two ways from a log, as referenced against the circular annual growth rings:

  • Tangentially: Cut on a tangent to the circular rings, these boards are referred to as flat (plain) sawn boards. Viewing the end of a board, the annual growth rings run from 0 to 35°.
  • Radially: Cut from the outside of the circle toward its center, along a path more resembling the spokes of a wheel. The boards that most align with this path are said to be quarter sawn, where the growth rings viewed from the end of the board can run from a perfectly perpendicular 90° to 60°. Radially cut boards whose growth rings are visible between 30° to 60° are said to be rift (sometimes called "straight") sawn.

How boards are cut

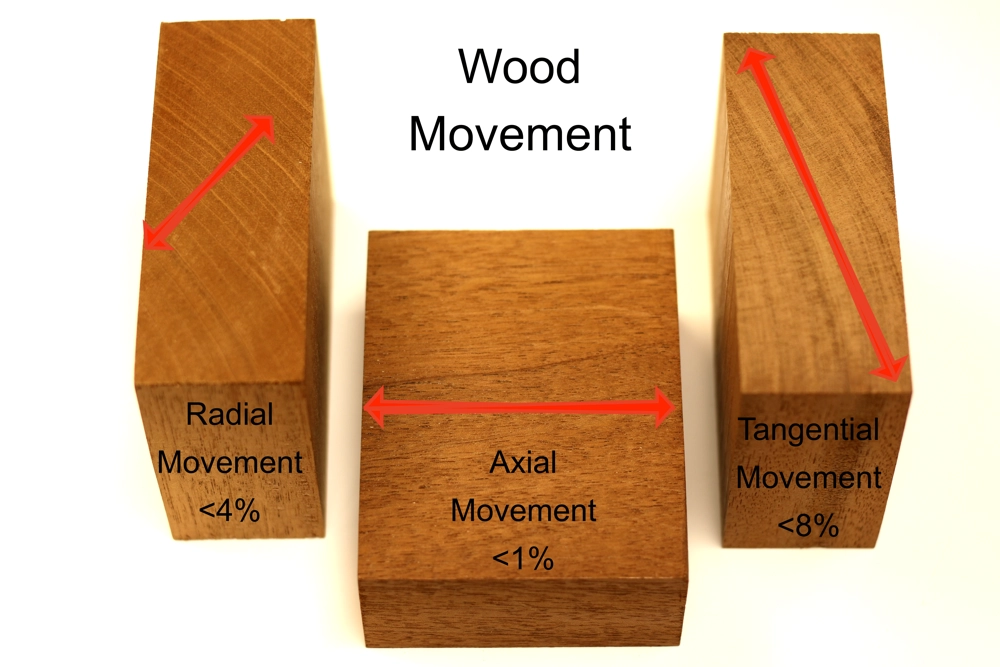
The propensity of wood to expand and contract as it absorbs and releases moisture from its surrounding environment classifies it as a hygroscopic material. Any board cut from any log will be subject to movement occurring along three axes relative to the growth rings of the tree the wood came from. Two of the three axes, radial and tangential, are of greater concern to luthiers.

  • Radial movement: Expansion and contraction in a direction perpendicular to the growth rings, typically the smaller amount of movement.
  • Tangential movement: Expansion and contraction in a direction parallel to the growth rings, usually the larger amount of movement.
  • Axial movement: Expansion and contraction along the grain direction. Movement in this direction is negligible in comparison to radial and tangential movement, and is typically ignored.

Radial and Tangential wood movement

Moisture or, more accurately, the capacity of a given piece of wood to take on and release moisture affects wood movement more than any other factor.

In theory, if one piece of wood was to move at a rate significantly greater than the piece it is glued to, we assume that something would have to give. If the woods are flexible enough, there may be no failure. If not, either the glue joint will fail or worse, there will be cracking or splitting.

Conventional thinking has maintained that, in order to mitigate future splitting, it is critical to align the grain direction of two mating wooden components. Since we have established that any piece of wood is going to move (contract or expand) more across its grain than along its grain, a second piece joined to it should be aligned to move in the same direction.

Countless guitars have been constructed in accordance with this thinking. The primary wooden components most affected are the sides and end blocks. Do these components, when glued together, actually move together? Ironically, the only instruments that are built where these components are even of the same species are Mahogany guitars. What are the chances that the end blocks were cut from the same tree as the sides?

Stop long enough to consider the following: All of these wooden components have been cut from different trees, different species, all having differing moisture content, and thus have differing propensity for movement (movement which, by the way, is rather minuscule when considering the dimensions we are dealing with).

End blocks (neck and tail blocks) don't typically crack unless a severe force is applied to them. When the sides split on your {enter favorite vintage guitar model, here}, please note how painstakingly aligned the grain direction of the end blocks were with the sides, and yet the sides split anyway! Which species are more prone to splitting, and why? What was the aged condition of the sides prior to construction (in other words, how far along toward perfectly dried was the wood when the instrument was first assembled)? How thin were those sides prior to being finished? I submit that these are more significant questions than, "How do I align grain direction of end blocks?"

A Clue

Wood was once a living tree. Having been cut from the tree, the oils, resins and lignin deep within the walls of the woods cells can take a lifetime to fully dry. During such time, that wood will continue to expand and contract based on its ability to absorb and release the moisture it is exposed to. But once the wood is fully dried and the lignin has crystallized, such wood will no longer take on moisture. Wood that doesn't take on moisture has no moisture to release. Wood that is not taking on or releasing moisture is NOT moving.

This issue of wood movement was of much greater concern back before wood was kiln dried and when glues were entirely dependent on wood mating techniques for bond strength. Modern kilns, torrifaction, laminations and glues such as epoxies can pretty much nullify the argument surrounding the proper alignment of grain direction, if you are willing to participate. Or don't, and continue to deal with the natural movement of wood.

Pre-mortised neck blocks

The Neck Block

In addition to providing a surface for the two sides, back and front plates to all join together, the neck block (also known to some as the heel block) serves in the role of housing the neck joint.

There are three common attachment methods whereby a neck may be affixed to an acoustic guitar body.

  • Glue-on: typically using a dovetail joint, but could also be a butt joint
  • Bolt-on: typically using a straight mortise and tenon, but could also be a butt joint
  • Pinned: may use either a dovetail or a straight tenon


NOTE: There is something of a fourth method of attachment; that being a loose tenon or dowel joint, called a butt joint. But I suggest thinking of such a method more simply as a Glue-on technique.

NOTE: A fifth method of neck attachment lets the sides of the body of the guitar into slots on either side of the heel (which is a section of the unified neck, not a separate component). The back and soundboard attach either to an additional neck block glued to the heel or an integral extension of the heel. Technically, this is also a Glue-on attachment method.

Mortise and tenon joints are either straight or dovetailed. The mortise is always cut into the neck block, and this determines the minimum size requirements for this block. Mortise and tenon design plays an additional role, one of alignment. In the case of the compound dovetail neck joint, the fit of the joint determines both it's integrity and alignment.

Neck blocks are commonly shaped from a quarter sawn or riff sawn solid hardwood rectangular block measuring ≅ 3 x 4 x 1.5 inches (≅ 8 x 10.5 x 4 cm).

For those familiar with USA dimensional lumber: a standard Douglas Fir wall stud has a nominal measurement of 2" x 4" x 8'. The axial (length) measurement is 8 ft (96 inches). The radial (thickness) measurement is 2" (actual: 1.5 inches) and the tangential (width) measurement is 4" (actual: 3.5 inches). For the sake of this example, let's pretend that a 2 x 4 measured 1.5" x 4". If you were to envision setting such a 1.5 x 4 on a miter or radial arm saw, and making thirty cuts, each cut being 3" long, the resulting 30 blocks might provide a mental picture of how commonly used Mahogany neck blocks are cut from billets (boards).

Solid neck blocks

Some builders add a step or ledge to the soundboard end of the neck block. This is done to accommodate additional features such as a bolted-down fingerboard extension, or to provide support for what is thought to be the downward pressure on the soundboard beneath the fingerboard extension due to neck rotation.

For more detail on the issue of neck rotation, see my article » Neck Block Shift and Soundboard Shear.

Martin neck block

Still others will incorporate both a ledge on the soundboard end and a foot that extends further out onto the back plate. These may be assembled from separate pieces of wood (in an attempt to try to match grain directions) or shaped from a single block, be it solid or laminated.

Yamaha neck block

The Tailblock

Traditionally, an acoustic guitar tailblock is a rectangular Mahogany block, cut from stock in the same way as the common neck block, but measuring approximately 1 x 3 x 5 inches. The depth will typically be reduced to anywhere from 5/8" to 3/4", and the height will match the thickest portion of the lower bout.

The tailblock can do more than simply provide for a means of joining the sides together. It may also house an endpin or strap jack. It is impressive how such a small projection can contribute to so much damage when the instrument is struck directly on the tail. Striking the tapered plastic or bone endpin, such as when the guitar is dropped, is often sufficient to split the tailblock and split one or both of the sides of the guitar. While jamming a tapered end pin deep into the tailblock is a pretty sure way to damage your guitar, metal strap jacks that combine a 1/4" jack with a strap button are also capable of ruining your day, should they take a sufficient blow.

Mahogany tail block blank

More and more guitar makers are transitioning away from solid wood tailblocks and toward laminations, with some using various plywoods. Baltic Birch is popular, as it incorporates only hardwood and minimizes or eliminates voids.

Baltic Birch plywood

I much prefer to construct my own laminated tailblock. I begin with a rectangular block, typically cut from lightweight Spanish Cedar. I first slice it lengthwise into three pieces. I cut the center slice in half, rotate both pieces 180°, cut a lap joint into the two halves, and sandwich those pieces between the first and third slices. The grain direction of the center layer is perpendicular to the two outside layers. Movement becomes a non-factor.

Laminated tailblock

Linings

In order to successfully attach a back or front plate to the sides of an acoustic guitar, a supporting ledge must first be added to the guitar sides to rest those plates on. With modern epoxies, one could force a sufficient connection between the back or soundboard and the thin edge of the sides. However, the moment you cut into that sharp edge to add protective and/or decorative binding, you would sever the connection. Leaving the side material thick enough to survive the addition of binding would produce a very heavy instrument; that is IF you could even bend such thick wood. Some instruments have been built using side laminations having honeycomb (Nomex) cores, thick enough to support direct attachment to the front and back plates, but such construction is beyond the scope of this article.

The earliest practical approach to solving the plates-to-sides attachment issue is seen in the Spanish tentallones, small rectangular or triangular pieces of wood painstakingly glued into place right next to one another all around the inside edges of the body. The guitar can then be assembled with confidence, and works very well for gut and nylon string guitars, as is evidenced by the myriad Spanish-style guitars built using this approach over the centuries. While providing ample support for the plate joinery, tentallones do very little to prevent the body from flexing. This is of significant concern when steel strings are in use.

Tentallones

Whether it was to add increased rigidity, or to speed up the installation process, or both, some clever soul introduced kerfing, also called kerfed lining, or linings. Beginning with a thin, rectangular or triangular-shaped strip of wood, such as Mahogany or Basswood, thin perpendicular slits, known as "saw kerfs" are cut into the wood using equidistant spacing. Those thin kerfs do not quite go all the way through the wood, resulting in a very flexible wooden strip. Installation results in an appearance that closely resembles tentallones.

Kerfing

So-called "reverse kerfed linings" are not triangular, and the kerfs are placed up against the sides where they all but disappear from sight. In addition to a cleaner visual appearance, reverse kerfing is much easier to install. More significantly, this style of lining adds measurably more rigidity to the sides than does standard kerfing, thought to result in even greater sustain. A reasoning behind this is that the more rigid the sides become, the less energy is lost in damping. Many (most) acoustic guitars are built using triangular kerfed lining, with more and more builders preferring reverse kerfed lining. Some makers still use tentallones.

Reverse kerfing

Having constructed guitars for many years using all three styles of linings, mentioned above, I came to prefer a different approach, that of laminated (sometimes referred to as "solid") linings, also called "rigid rims" or "pre-bent" rims/linings (and incorrectly called solid kerfing - a kerf is a saw cut perpendicular to the grain. A strip of wood cannot be kerfed and solid at the same time, or can it? Oh, never mind).

I laminate thin strips of Spanish Cedar together which results in a very rigid rim onto which both the front and back plates can then be glued. These linings can be laminated straight and then bent into shape after the glue dries, or they can laminated in a shaped form such that once the glue dries or cures, they need only be installed.

Using rigid rims goes a long way toward eliminating body flex, which can contribute to soundboard deformation, but that is a topic for another article.

Using kerfed linings may be more practical for the builder having many body shapes and sizes, or constantly prototyping, as constructing multiple forms just for gluing up linings can become its own career path.

Laminating your linings in a shaped form does have a speed advantage over laminating straight linings and then bending them: It takes the same amount of time to glue up a straight board as it does a shaped one, and you don't have the additional time requirement of bending your straight lamination. This approach also benefits from zero springback, and can result in a perfect fit.

Laminated linings

Summary

My goal in presenting this information is both to inform those who are curious about how the frames of acoustic guitar bodies are built as well as provide some insight into what is going on behind the scenes of issues such as tail block splits, neck block shifts and soundboard shears.

© Copyright 2025 Cozad Guitars - All Rights Reserved