Building the Continental

Introduction

The Continental is one of the few guitars I build where I follow a more "conventional" approach to guitar construction. It features an OM body shape, has a center soundhole, solid Rosewood back and sides, a Western Redcedar soundboard, and even includes a truss rod!

Where it differs from the pack is in the body depth and the soundboard bracing. The body is 4" deep at the neck block and 4-5/8" deep at the tail block. The soundboard is braced using a double-X pattern.

It is a favorite with players for all the right reasons. Whatever your style, this guitar is loud and bright. Instead of sounding boxy, or cramped, the bass response is big and resonant. I share some of my build process here in the hopes that you might be encouraged to step beyond the usual and experience the rewards yourself.

This particular guitar includes some uncommon features that I thought worthy of documenting. It might inspire confidence among those who may be unaware of other approaches. The only purfling that I added conventionally, meaning, prior to, or at the same time as the binding, was the soundboard purfling. I added the side and back purfling AFTER the binding and the end graft were in place. Also, due to an unfortunate accident after the body was complete, when an ugly ding was made in the soft Cedar soundboard, I added inlay to the soundboard. I inlaid the fretboard with Mahogany and Paua, using a combination of hand tools and a Dremel. Finally, while not all that unusual, I inlaid the headstock AFTER the headplate was attached and shaped. 

Specifications
  • Model: Continental
  • Upper Bout: 11.25″
  • Waist: 9″
  • Lower Bout: 15″
  • Body Length: 19.25″
  • Body Depth (Tail block): 4.625″
  • Body Depth (Neck block): 4.0″
  • Scale Length: 24.9″ (632.5 mm)
  • Nut Width: 1.75" (45 mm)
  • String Spacing: 2-1/4"
  • Soundboard: Western Redcedar
  • Back and Sides: East Indian Rosewood
  • Bracing: Adirondack Red Spruce
  • Bracing pattern (Back): Conventional ladder
  • Bracing pattern (Soundboard): Double-X
  • Binding: Gabon Ebony
  • Soundhole Binding: Indian Rosewood
  • Rosette: Paua
  • Neck: 5-piece Mahogany
  • Fretboard: Gabon Ebony
  • Fretboard Inlay: Mahogany and Paua
  • Headplate: Gabon Ebony
  • Bridge: Gabon Ebony
  • End graft: Gabon Ebony
  • Tuners: Sperzel Open-back Trim-lok
  • Options: Soundboard Inlay
  • Weight: 4.45 lbs (tuners, strings, pickup)

Plate Assembly

There was a time when trees that would be large enough in diameter to fashion a large guitar’s soundboard or back entirely from a single slab or billet of wood were in plentiful supply. Within the last century, as large trees were harvested faster than they were re-planted, the option of beginning with a single, massive plate of wood began to quickly disappear.

Regardless of availability, the potential for splits across that large of a span of wood due to seasonal or environmental movement could be mitigated by ripping large plates lengthwise and rejoining them, improving their stability.

Book matching, the practice of slicing two (2) adjacent plates (from the same half of the tree), laying them open like a book, and joining them opposite a center seam (creating a mirror image of the grain pattern) proved to be more structurally sound, more popular and more aesthetically pleasing than looking at a single, large cross-section of a tree.

I use a plate joiner jig to glue two (2) book matched halves of the Cedar soundboard of this deep-bodied, OM-sized guitar together. The two (2) book matched halves that make up the Rosewood back are assembled in the same manner.

For both front and back plates, two (2) boards are matched, planed or sanded (thicknessed, meaning "thinned"), glue is applied, and the boards are assembled into this clever contraption which pulls them tightly together with very even pressure while preventing them from buckling as the glue dries.

Cozad Guitars - Plate Joiner

The Soundboard

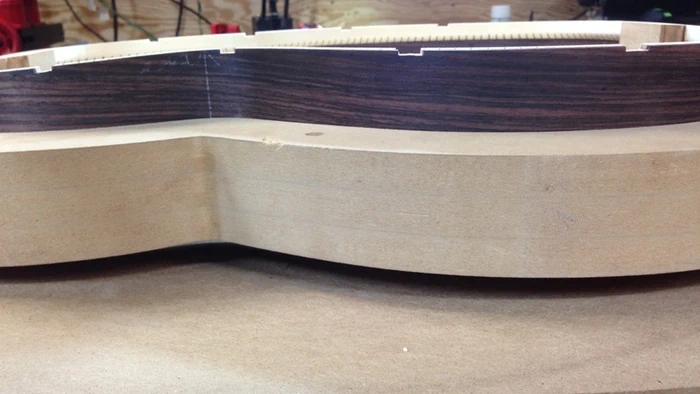
The Western Redcedar that I selected for the soundboard was cut 30 years earlier from a tree that was more than two hundred years old! It is stiff, among the stiffest I have encountered. Often, Cedar will be exceptionally stiff along the grain, even rivaling Spruce, though it tends to be weaker across the grain. As a result, many builders will leave Cedar Soundboards a bit thicker than their Spruce counterparts to make up for the difference. Occasionally, one may encounter some really special wood that can be thinned a little more than the rest. I have high hopes for this guitar!

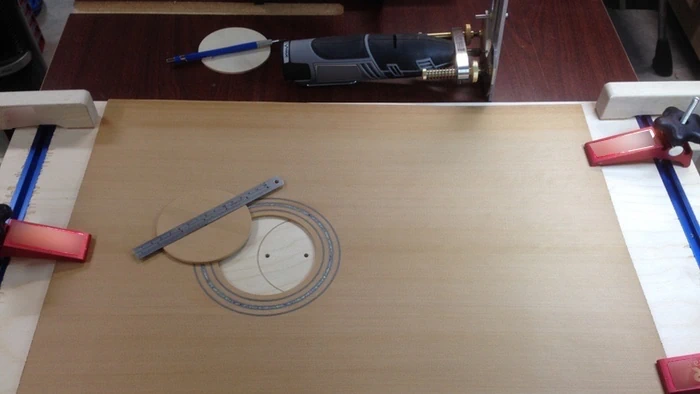
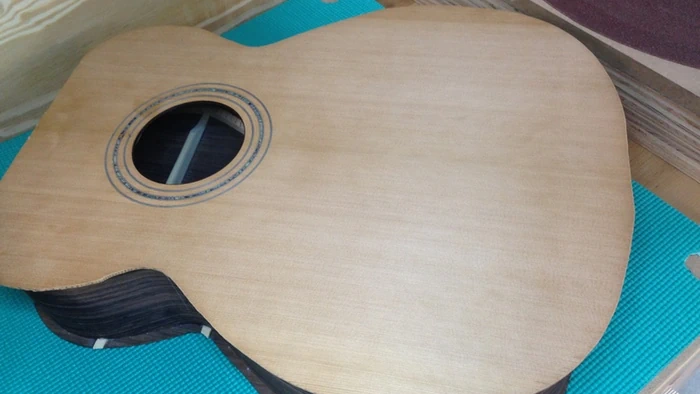
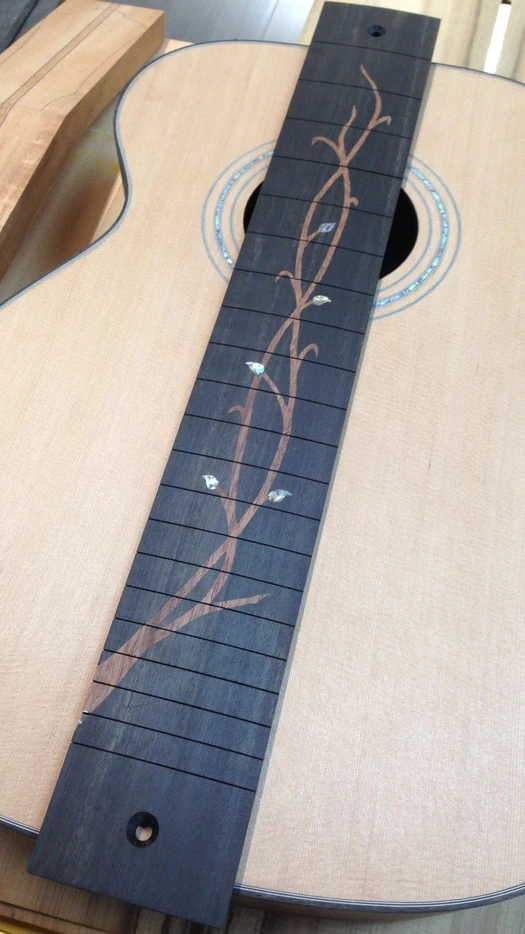
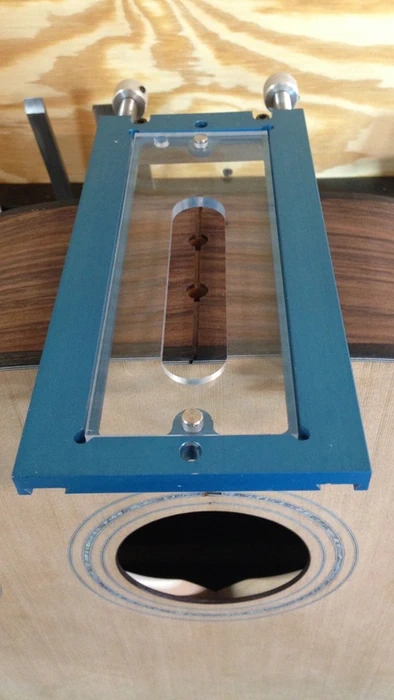
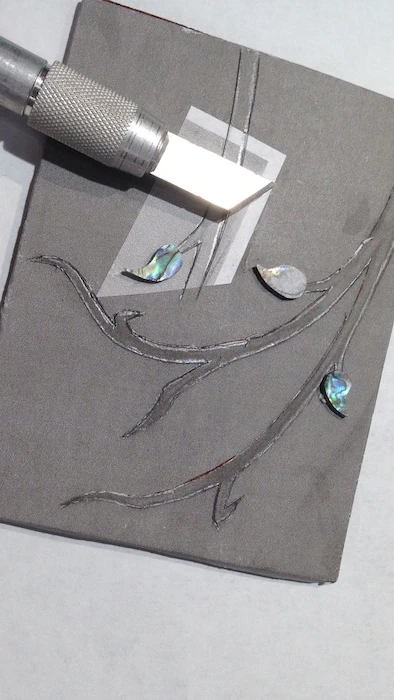
I route the purfling and Paua soundhole rings using a rotary tool mounted in a mini router jig and attached to a circle cutter. After the inlay work is complete I cut a circle all the way through the soundboard, creating the soundhole.

This opening allows air to pump in and out of the enclosed chamber that comprises the body of the acoustic guitar. That pumping action is initiated by the vibration of the steel strings which, on this guitar, will be exerting upwards of 160 lbs. of tension at the bridge. The kinetic energy produced by the vibrating strings transfers across the saddle, down into the the bridge/bridgeplate assembly, and radiates across the soundboard in waves, very much like water in a small pool. In reaction, the soundboard moves (or flexes) up and down similar to a speaker cone. The results are what we refer to as both the “sound” and “tone” of the guitar.

Cozad Guitars - Soundboard Outside

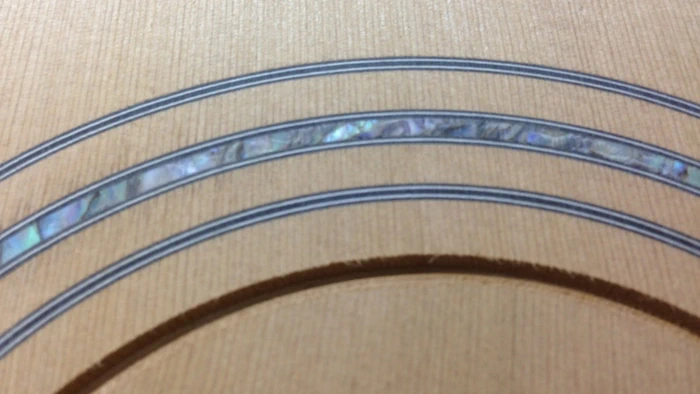
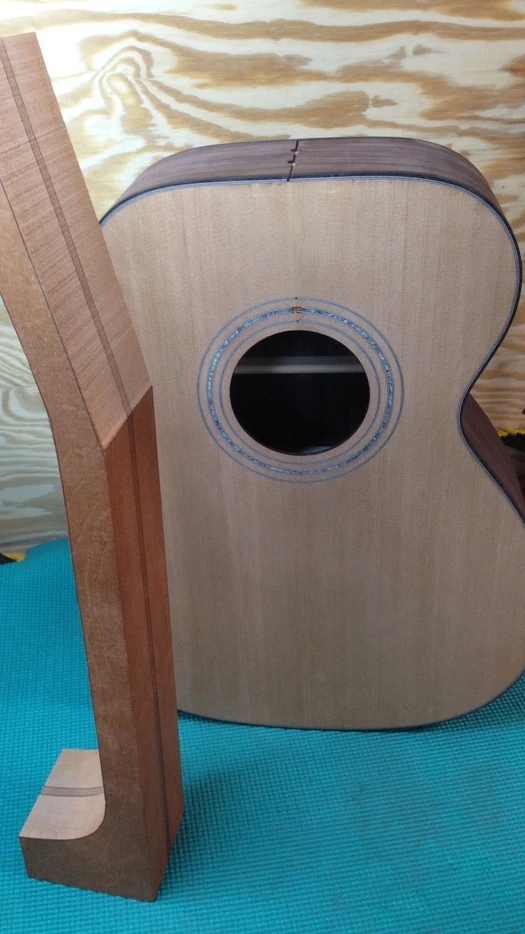
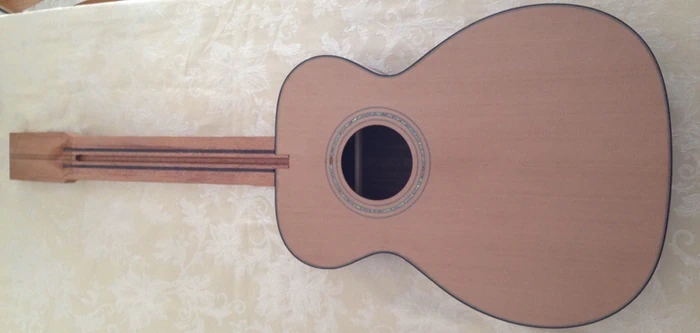
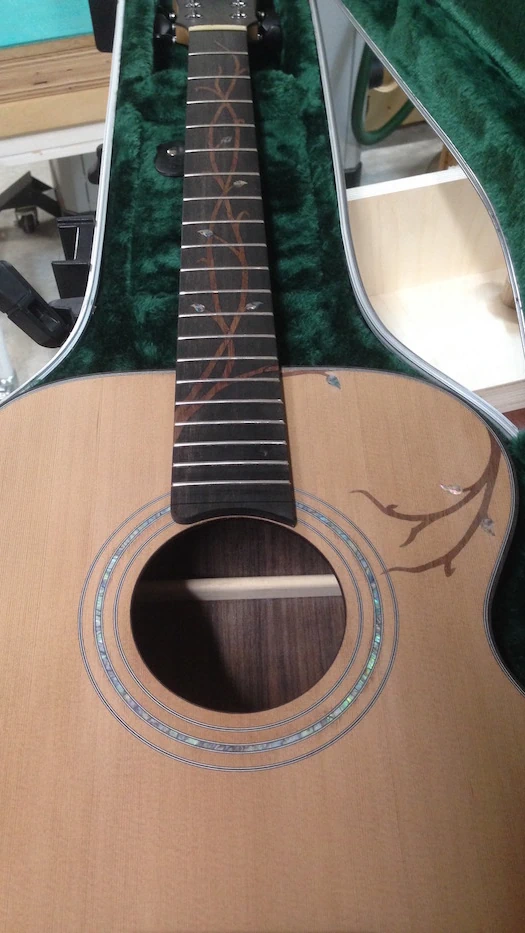
A close-up image highlights the beauty of the combination of Cedar, Paua, and black-white-black (BWB) purfling circling the soundhole, forming a series of decorative concentric rings that are often referred to collectively as a rosette.

Cozad Guitars - Soundboard Rosette

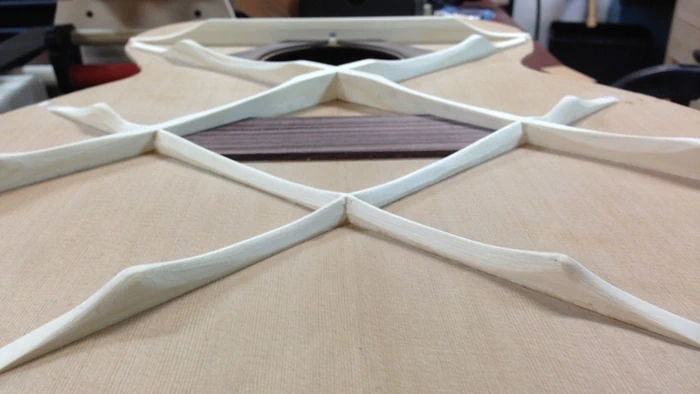
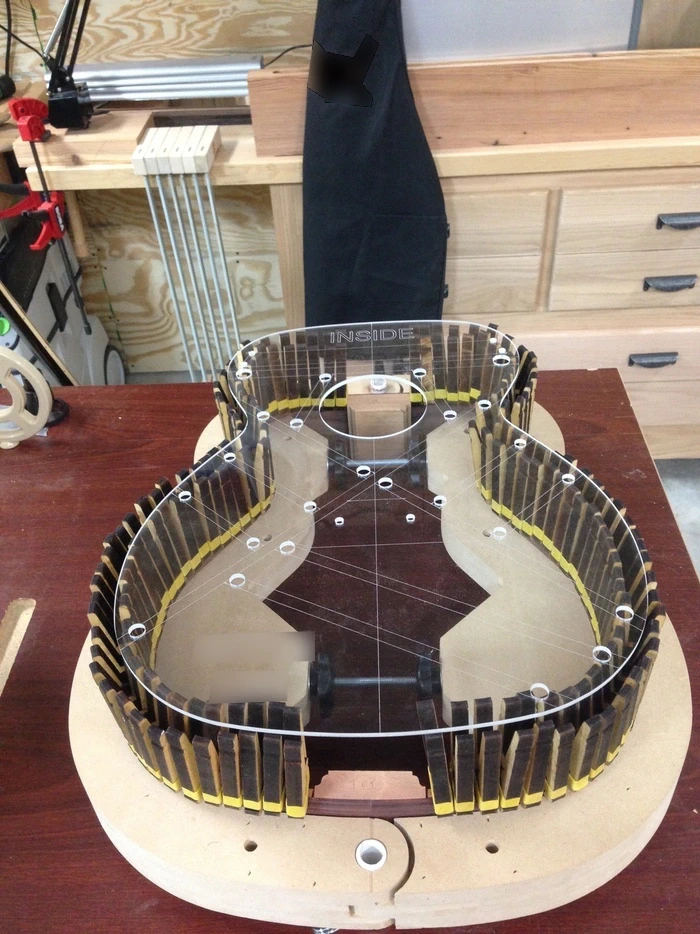
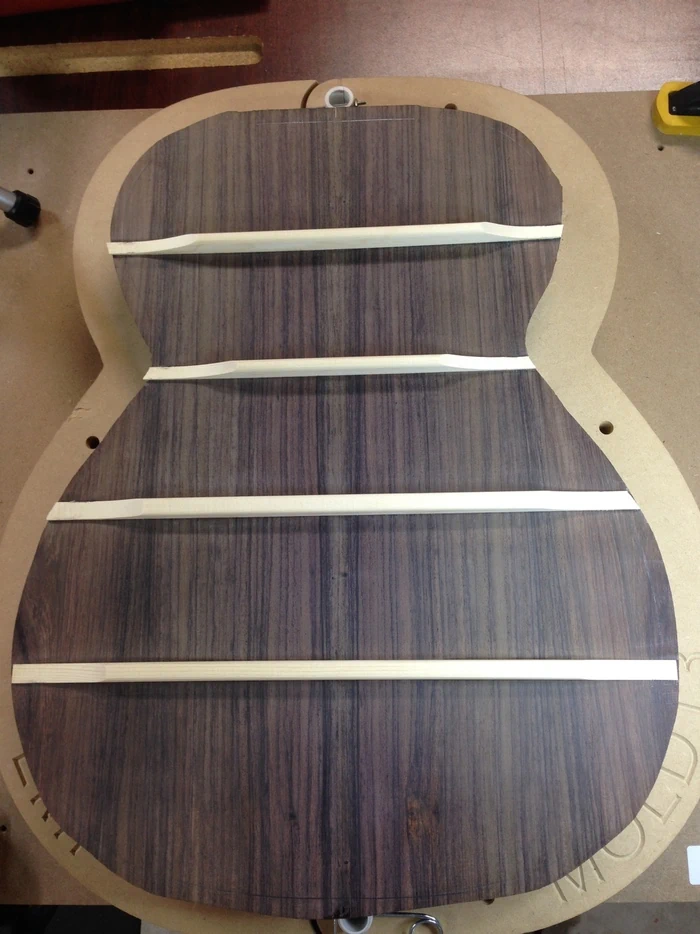
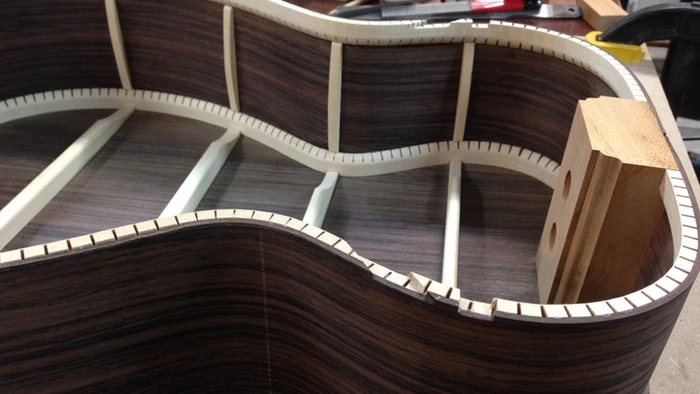
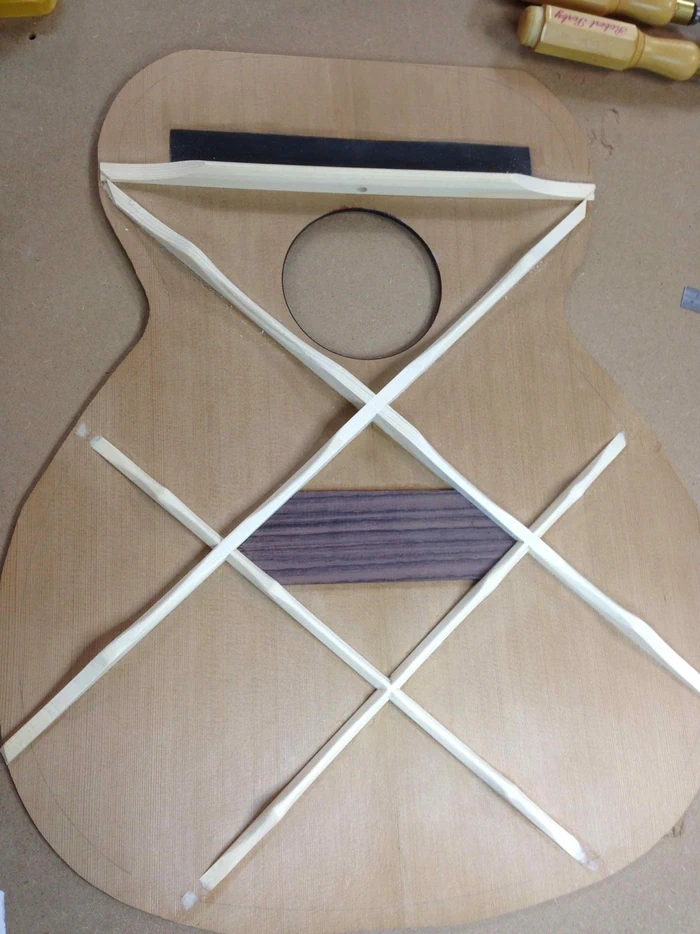
When the stiffness and thickness of the soundboard are considered, the bracing (material, pattern, dimension) is adjusted accordingly. For this particular instrument, I chose to employ a progressive double-X bracing pattern with a Rosewood bridgeplate. I wanted to coax the brightness out of this top, and I have found the double-X pattern to be very suitable for the task. To maximize volume, I will keep the soundboard at a relatively flat 50 ft radius. The additional “X” below the bridge will add the extra support where it’s needed, especially for this flat of a top.

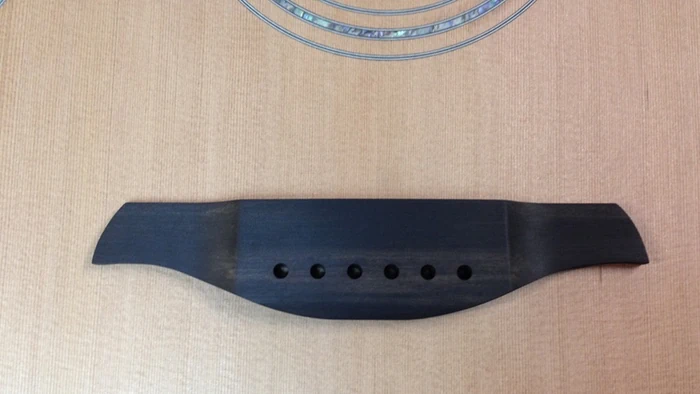
Near the center of the lower bout of the soundboard, directly beneath the bridge, lies the bridgeplate. There has been speculation that this thin piece of material (traditionally, Rosewood or Maple) became popular among luthiers during the advent of the ball-end steel strings, as the steel ball would quickly chew through the softwoods traditionally used for the soundboards. Maple is thought to lend a "brightness" to the overall sound, while Rosewood is "oily and tough," a good choice to resist the wear from the metal.

Early in my lutherie adventures, I had a wild thought: Why not use both woods, and benefit from each wood's contribution? I began laminating Maple and Rosewood for my bridgeplates, usually positioning the Maple against the soundboard. With the stiffness of the top, and the addition of the double-X pattern, the last thing I need is more brightness. Here, I will simply use a solid Rosewood bridgeplate.

In addition to its "resist-the-metal" role, as well as its "sonic enhancement" role, the bridgeplate effectually sandwiches the soundboard between itself and the bridge, and assists in keeping the soundboard flat(ter) in this critical area. The idea is to mitigate the potential of the bridge to simply peel off the soundboard as a result of string tension.

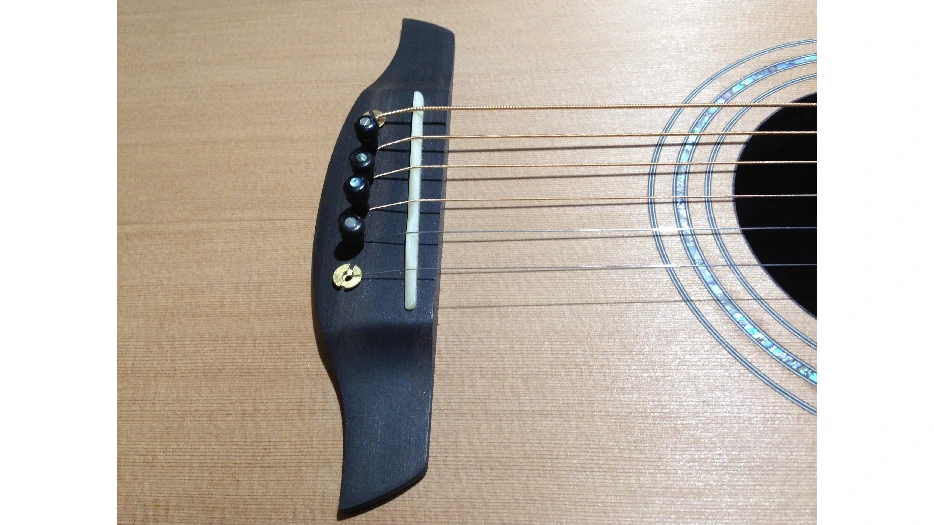
Undersized or overly-thin bridgeplates can accompany guitars having the most impressively low frequency response (lots of bass)...albeit short-lived, as the soundboards will often begin to pull, or belly, upwards. That is not necessarily a problem, tone-wise, but it does present a major challenge in estimating the (eventual) neck angle. The angle at which the plane of the fretboard encounters the (approximate) plane of the contoured/radiused soundboard must be optimized to prevent the strings from either lying on the frets or standing too far off the frets. Guitars that belly (pull upward due to string tension) significantly typically end up requiring early neck resets, as the strings eventually rise too high above the fretboard for comfortable playing, and no amount of saddle height adjustment can correct the problem. They may sound great, but they are no fun to play!

Rapid bellying after initial construction is evidence of some combination of insufficient soundboard stiffness, bracing strength, and bridgeplate size.

Conversely, too large a bridgeplate is a real tone killer (as is too thick or too stiff a soundboard, along with too much bracing). Sizing a bridgeplate incorrectly can critically impact the performance of the instrument.

While arguably sacrificing some lower frequency response, leaning slightly toward a larger plate versus a smaller plate provides the peace of mind that the soundboard will stay where it belongs over time.

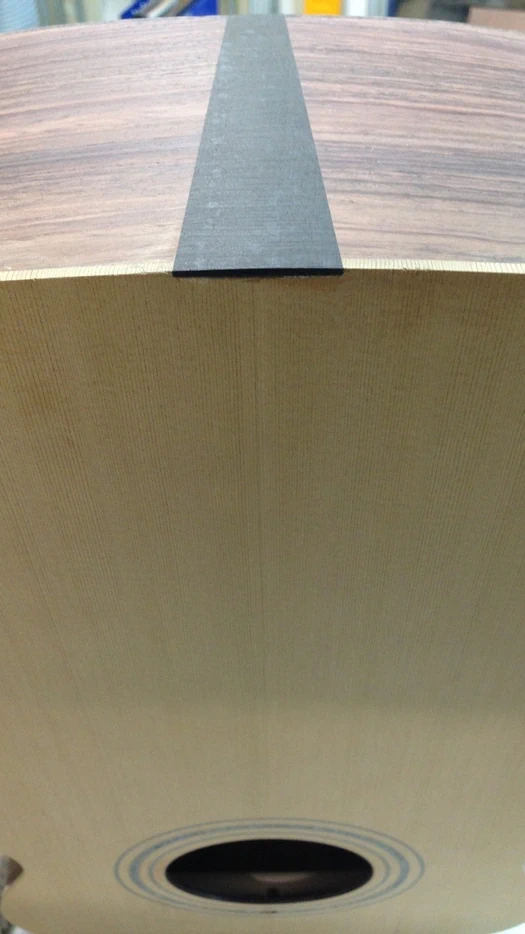
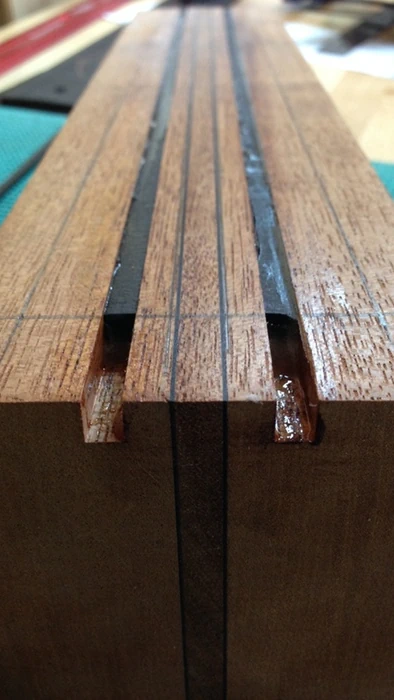
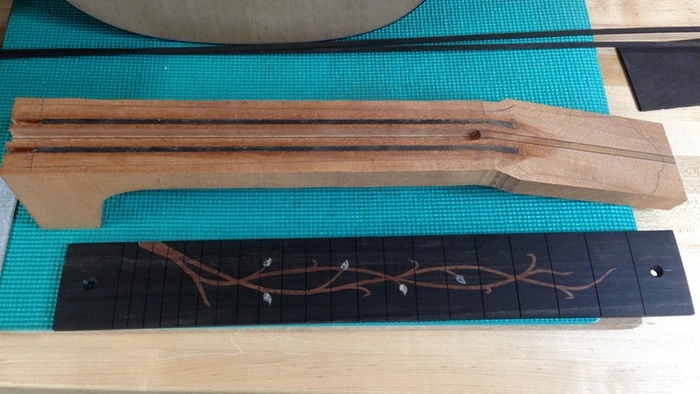
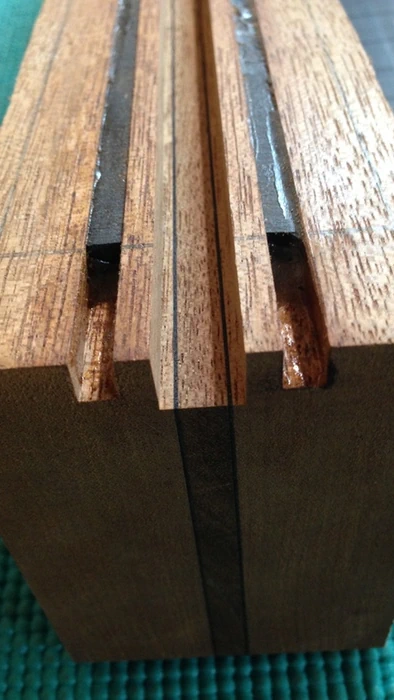
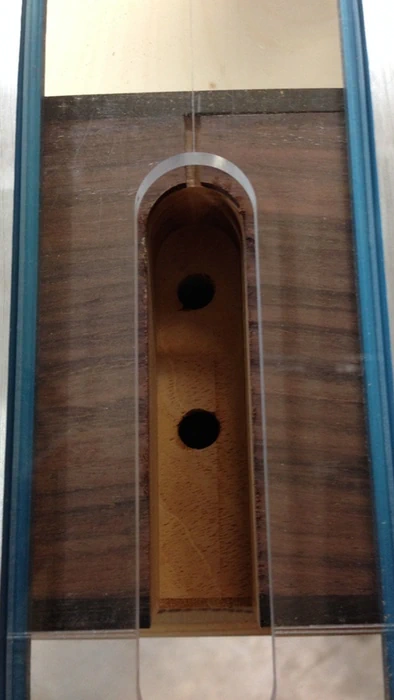
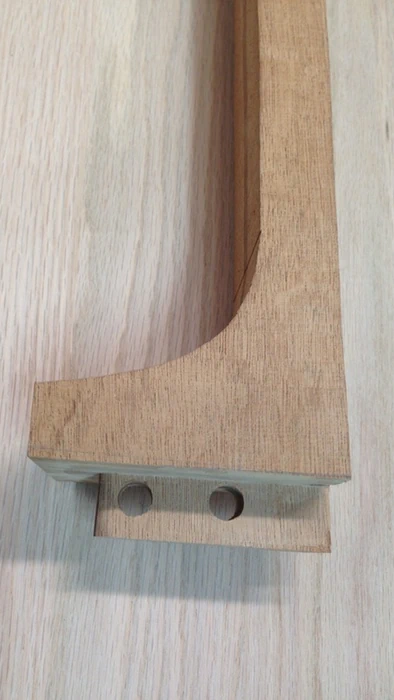
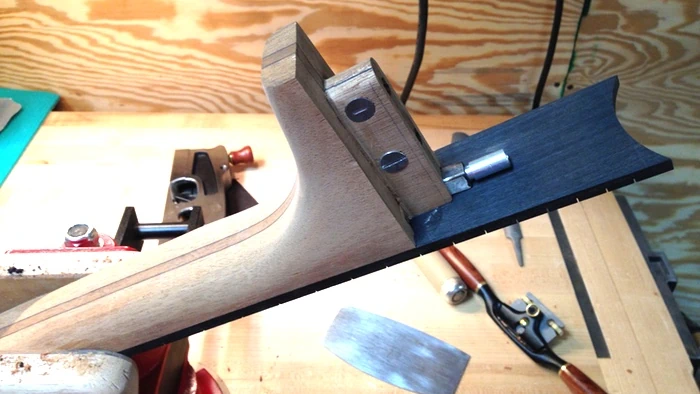
The soundhole is bound in Rosewood. A carbon fiber fretboard patch is epoxied across the soundboard next to the transverse brace. On most steel string acoustics, the fretboard extension (the part of the fretboard that extends out onto the soundboard, toward the soundhole, past the point where the neck meets the body) is glued directly to the soundboard. The two (2) materials expand and contract at different rates. The idea behind the fretboard patch, which is applied to the backside of the soundboard, is to minimize the soundboard’s contraction and expansion at this critical juncture. In the case of this guitar, the fingerboard extension is not glued but rather secured to the soundboard using a small nylon bolt. The epoxied carbon fiber provides something more significant than soft Cedar to attach the fingerboard to.

Cozad Guitars - Soundboard Inside

The objective with bracing is to support significant string tension while allowing the soundboard to vibrate as freely as possible from the plucked strings' energy. It is a delicate balance: An over-braced soundboard results in a rather dull, lifeless guitar, as the strings must be strummed or plucked hard in order to generate any front plate vibration which, in turn, is dampened by all that bracing. An under-braced soundboard can result in a collapse or implosion, though it will likely sound wonderful during it’s short life.

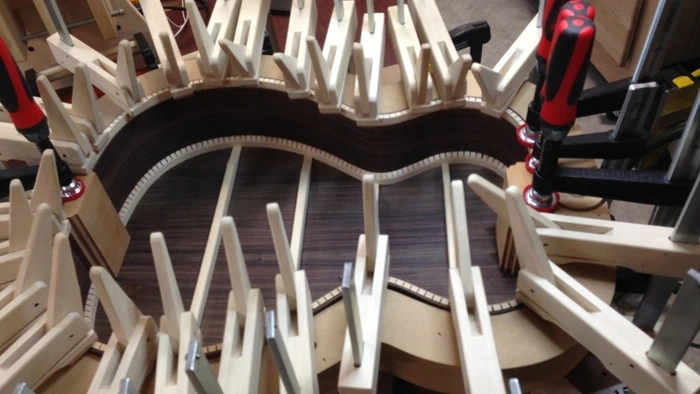
The braces are glued onto the soundboard as long, thin interlocking rectangles, and are both scalloped and shaped in place with a chisel. Some careful sanding dresses them up for final presentation. Of note, this particular bracing profile happens to resembles duck heads or bottlenose dolphins.

Cozad Guitars - Soundboard Bracing Profile

The Back and Sides

The Basswood reverse kerfing is applied to the top and bottom of the Rosewood sides (destined to support the front and back of the guitar, respectively), extending from neck block to tail block. This lightweight ledge / rim supports the front and back plates, providing a more substantial glue surface at the sides.

Cozad Guitars - Sides in Form

Braces are added to the Rosewood back. A center graft is intentionally omitted. With the advent of modern glue(s) and proper clamping, back plate center grafts serve little purpose but to add weight.

Cozad Guitars - Rosewood Back Inside

The back is joined to the sides (one simply cannot have too many clamps, can one?).

Cozad Guitars - Attaching the Back

A view of the tail block shows a recess for the drilling of a (completely optional) through hole. This hole will receive an end pin jack, as electronics will be added, later. It could get a traditional end pin, just as easily.

Cozad Guitars - Tail Block

This view of the neck block shows the two (2) recessed holes for the bolts used to secure the neck to the body. Much has been written and discussed regarding the particular method of attaching the neck to the body, with camps dividing over the traditional glued-in dovetail and bolted-on mortise and tenon. This guitar will be made using the bolt-on neck approach. I have not measured any tone loss between the two methods, and neck adjustments (neck resets) are dramatically easier to perform! If there is a downside to a bolt-on neck, it would be the additional weight of the metal hardware.

Cozad Guitars - Neck Block

Closing the Box

All four (4) braces on the back plate and the primary X brace and transverse brace on the front plate are deliberately left longer than the dimensions of the body. The sides will be notched to receive these through braces, allowing the ends of these braces to rest directly on the sides while the balance of the front (and back) rests upon the kerfing.

Cozad Guitars - Sides Notched for Bracing

The guitar’s sides (sometimes referred to as “ribs”) are also reinforced, albeit with very small, lightweight braces.

Cozad Guitars - Rib Reinforcement

The soundboard (front plate) is glued on.

Cozad Guitars - Gluing on Soundboard

Binding and Trim

A decorative plate known as an end graft is often added to the tail end of the guitar, spanning what would be the seam formed by the two (2) sides butting together at the tail block. This wooden wedge provides for a visually pleasing break in the seams of the guitar sides as well as eliminating the need to perfectly align and match the grain of the two (2) sides. Even when sides are matched correctly, without an end graft, there exists the possibility of appearing like something is missing or was forgotten.

Extra attention is paid to centering the soundboard on the centerline of the body. I nailed the center seam. But you would never know it until you inspect it very, very closely. Humorously (aggravatingly), a dark grain line mocks my effort, displaying prominently just 1/32″ off center, where the two (2) halves of the front plate join. I hadn’t noticed it until it was compared with true center, as you see in these two (2) photos of the end graft. I did it right!, No, really! Please believe me. :-)

Cozad Guitars - Routing for End Graft

The end graft is completed, having nice, clean lines.

Cozad Guitars - End Graft

The Neck

The neck is cut on a bandsaw. Here I have cut two (2) necks from a laminated block of Mahogany. These neck blanks are resawn from large billets, planed and glued back together with additional wood strips for the purpose of increasing stability and adding visual interest to the back of the neck.

The neck is intentionally cut a bit wider and thicker than it’s final dimensions, as it will be sized and shaped to final dimensions in a later step.

Cozad Guitars - Bandsawn Necks

Not everyone feels the need to embellish the shape of their headstock, but I do. A distinct shape can be readily identified with the builder, and provides an opportunity to be creative. I worked diligently to produce a unique, yet simple design, one that both honored the instruments that inspired my efforts, and let me make my own statement. The crest atop the headstock is all Cozad Guitars!

Cozad Guitars - Headstock Outline

Here we see the two (2) most basic components of the modern steel string acoustic guitar, the neck and the body.

Cozad Guitars - Neck and Body

The Fretboard

An Ebony fretboard will be glued to the neck. In addition to being perfectly flat, the fretboard must be slotted to hold metal frets that have been carefully spaced. I accomplish this by using a template and a table saw jig. I use a steel fret slotting template in conjunction with a dedicated crosscut sled for accuracy and repeatability.

Cozad Guitars - Fret Slotting Sled

I have sketched an idea on paper that I want to inlay into the fretboard.

Cozad Guitars - Fretboard Inlay Sketck

After transferring the drawing to wood, I can cut out the shapes by hand. The vine is fashioned from a single piece of mahogany using a jeweler’s saw.

Cozad Guitars - Cutting the Fretboard Inlay

Many people are intimidated by the perceived degree of difficulty of this type of work. In no way do I mean to under-value the art form of inlay when I say that it is tedious, but it is not difficult. Attention to detail, patience and a steady hand are required.

Cozad Guitars - Fretboard Inlay Pieces all Cut Out

I mount the fretboard to a clever jig. and then pass it through a drum sander several times, rotating the fretboard along it’s length on each pass. This results in an ever-so-slightly convex (radiused) surface that is then finished by hand. After radiusing, the fingerboard is routed to receive the inlay.

Cozad Guitars - Fretboard Inlay routed

I cut several small florets from Paua and inlayed them into the fretboard along the mahogany vine. The placement of the florets is not accidental. These are fret markers, and provide the player with a quick visual reference for finger placement.

The inlay is added after radiusing the fretboard, in order to minimize any sanding of the material (if it was inlayed while the fretboard was flat, and then the fretboard was radiused, that extra sanding would likely sand right through much of the inlay material).

Cozad Guitars - Fretboard Inlay Complete

The Truss Rod and Stiffeners

The neck gets stiffened using two (2) carbon fiber rods.

Having constructed a number of necks, using a number of methods, both with and without carbon fiber, and both with and without truss rods, I have developed my own preferences.

My "favorite" neck stiffening solution relies solely on a carbon fiber D-Tube from DragonPlate. If, in lieu of the D-Tube, I am wanting to incorporate a truss rod (eg, to satisfy a specific Client's request), then I will add carbon fiber to the neck, as you see here.

I believe the addition of carbon fiber to the neck is beneficial in more than one way. It adds torsional stability and is typically lighter than the wood it replaces. In the case of my D-Tube necks, I have no doubt that they contribute to an overall "brighter" response and greater sustain. Supplementing a truss rod with carbon fiber stiffeners most assuredly can strengthen an otherwise weak area beneath the nut.

Cozad Guitars - Neck Truss Rod

A close-up of the carbon fiber rods, epoxied into the neck.

Cozad Guitars - Close-up of Carbon Fiber Rods

The slot for the two (2)-way, adjustable truss rod is routed. Note that the adjustment occurs through the soundhole, leaving the wood at the headstock as thick as possible. This, combined with the carbon fiber rods, strengthens an otherwise structurally weak area of an acoustic guitar. I have never had a neck break at this location, though I have never deliberately attempted to break one, either.

Cozad Guitars - Truss Rod Slot
Cozad Guitars - Truss Rod Slot Close-up

The Mortise and Tenon

A mortise is cut into the body of the guitar using a plunge router. A router jig and template, called an edge vise, is used for exact positioning. This tool is used in conjunction with a precision neck angle jig.

Cozad Guitars - Cutting the Mortise
Cozad Guitars - Mortise Complete

This neck is held to the body using two (2) socket head cap screws, wavy washers and steel cross dowels (threaded inserts may be used in place of cross dowels, if desired, and are lighter in weight).

Cozad Guitars - Bolt for Neck Tenon

Holes are drilled in the neck, prior to cutting the tenon, in order to house the cross dowels.

Cozad Guitars - Neck Tenon Holes

The neck is then clamped into the neck angle jig where the tenon is cut using the same plunge router that cut the mortise. The angles of the cuts are very important.

Cozad Guitars - Neck Tenon

The neck, with its tenon, and the body, with the mating mortise.

Cozad Guitars - Body Mortise and Neck Tenon

The tenon fits tightly into the mortise, and the bolts secure the neck in place, snug up against the body.

Cozad Guitars - Neck to Body First Fit

Completing the Neck

With the truss rod secured in the slot, the fingerboard is aligned and glued to the neck. The neck is shaped and dimensioned using nothing but hand tools. A coarse rasp does the rough shaping, a file shapes the curves, and a spokeshave smoothes the straight lines.

Cozad Guitars - Shaping the Neck
Cozad Guitars - Shaping the Neck Heel View

Decorative Purfling

Decorative purfling is added to the sides and back. Much like fingerboard inlay, the work is tedious but not difficult. And the results speak for themselves - very dressy!

Cozad Guitars - Side Purfling
Cozad Guitars - Back Purfling

The Headstock

The headplate is glued on to the headstock and shaped to follow the existing contours.

Another trip to the bench with the jeweler’s saw, and my spiral “C” logo is cut from Paua shell, traced onto the headstock and inlaid.

It is definitely easier (and less stressful) to inlay a headplate before it is glued to the headstock. However, perfectly locating a pre-inlaid headplate during glue-up comes with its own challenges.

Cozad Guitars - Paua Logo

The headstock is drilled to accept the tuners. A shallow recess, slightly larger than the tuner washers, is also drilled to house the washers and nuts.

NOTE: This is an aesthetic enhancement I have learned from Kent Carlos Everett, a look that I really like. Typically, machine head washers and nuts sit atop the headplate. Slightly insetting the washer and nut adds a distinctive visual element.

Cozad Guitars - Machine Heads

Recovering from Damage

When I was moving the body of the guitar in preparation for finishing, I {cringe} ended up with a sizable ding in the cedar top. I attempted to steam out the dent, but the appearance was distasteful. Plan B: I proceeded to decorate the soundboard by adding inlay to the upper bout, incorporating the area of the dent.

More mahogany vine and Paua florets are cut for inlaying the soundboard. The vine will appear to curl off the fingerboard and onto the upper bout of the body.

Cozad Guitars - Soundboard Inlay
Cozad Guitars - Fretboard and Soundboard Inlay

The Bridge

The bridge is fashioned from a piece of Ebony (coordinated to match the fingerboard, headplate and end graft). Measurements are calculated and the soundboard is lightly marked where the bridge will be glued.

Cozad Guitars - The Bridge

The bridge is temporarily bolted to the soundboard and strings are added.

When using a bridge pin styled bridge, the bridge can be temporarily secured to the soundboard using a clever tool called an acoustic bridge bolt in two (2) of the six holes that have been drilled to accept the bridge pins. The brass bolts are center-drilled through their length, allowing guitar strings to be passed through the hollow centers. Using these bolts to hold the bridge on the soundboard, the guitar can be strung up for a sound test prior to finishing. Note that there is very little, if anything, that can be done about it at this point if you don’t like what you hear, but it is a clever way to sample what is coming!

This guitar just happens to sound amazing! I knew that Redcedar top was going to be special. Keeping the top on the flat side gave it outstanding volume. It is delightfully bright for a Cedar-topped guitar, thanks to the bracing design.

Cozad Guitars - First Stringing

Summary

The Continental, my 14-fret Rosewood and Western Redcedar OM, is a competitor!  Built with the depth of a Dreadnought, it easily outperforms its shallow-body siblings. The double-X bracing pattern lets the player drive the soundboard HARD, yet remains responsive to the lightest touch.

Options abound for this model, whether it's the addition of a simple pickguard to protect against heavy strumming, or a carbon fiber D-Tube neck to lighten the guitar and increase the sustain, or a transitional arm bevel for extended comfort, or a sound port in the upper bout, and more!

Cozad Guitars - The Continental